The most legendary island sunsets are not found by chance, but by understanding the interplay of geography, atmosphere, and photographic technique.
- Western-facing coasts with an unobstructed ocean horizon offer the most dramatic light due to increased atmospheric filtering.
- The most vibrant colours often appear 15-20 minutes *after* the sun sets, a period known as the ‘afterglow’ that most travellers miss.
Recommendation: Instead of chasing famous-but-crowded spots, use this framework to scout unique locations where landscape, timing, and atmospheric conditions converge for an unparalleled sunset experience.
The quest for the perfect sunset is a timeless travel ritual. We chase the sun to the edges of continents, seeking that fleeting moment of celestial fire. Ask any traveller for a recommendation, and the usual suspects will surface: Santorini’s caldera, a beach in the Maldives, or the cliffs of Ibiza. While undeniably beautiful, these famous viewpoints often come with crowds and a sense of predictability. The chase itself becomes more about ticking a box than a genuine discovery.
But what if the key to an unforgettable sunset wasn’t a specific location, but a specific kind of knowledge? What if, instead of following the crowds, you could learn to read a landscape and predict where a truly spectacular display of light and colour will unfold? The secret shared among seasoned photographers and geographers is that a world-class sunset is not an accident of beauty. It’s a masterpiece born from the precise alignment of geography, atmospheric science, and technical skill. It’s about understanding why western-facing coasts have an inherent advantage and why the best light often arrives after most people have already packed up and left.
This guide moves beyond the generic lists to decode the science and art of the perfect island sunset. We will explore the geographical factors that create the most dramatic light, the technical photography skills needed to capture it, and the critical timing mistakes to avoid. By the end, you will be equipped not just with a list of potential destinations, but with a framework to discover your own legendary sunsets, anywhere in the world.
Summary: The Photographer’s Guide to Legendary Island Sunsets
- Why Do Western-Facing Island Coasts Produce More Dramatic Sunsets Than Eastern Shores?
- How to Photograph Island Sunsets With Properly Exposed Foregrounds and Vibrant Skies?
- Clifftop Sunset Viewpoint or Beach-Level Watching: Which Creates More Dramatic Photos?
- The Sunset Timing Mistake That Means Missing Peak Colour by 10 Minutes
- When Are Island Sunsets Most Vibrant: Seasonal Atmospheric Patterns and Dust Levels?
- Why Do Corner Hotel Rooms Offer 180-Degree Ocean Views Worth the 30% Upcharge?
- When Does Natural Light Best Showcase Island Architecture: Seasonal and Daily Timing?
- Which Islands Offer the Most Diverse Coastal Landscapes in a Single Destination?
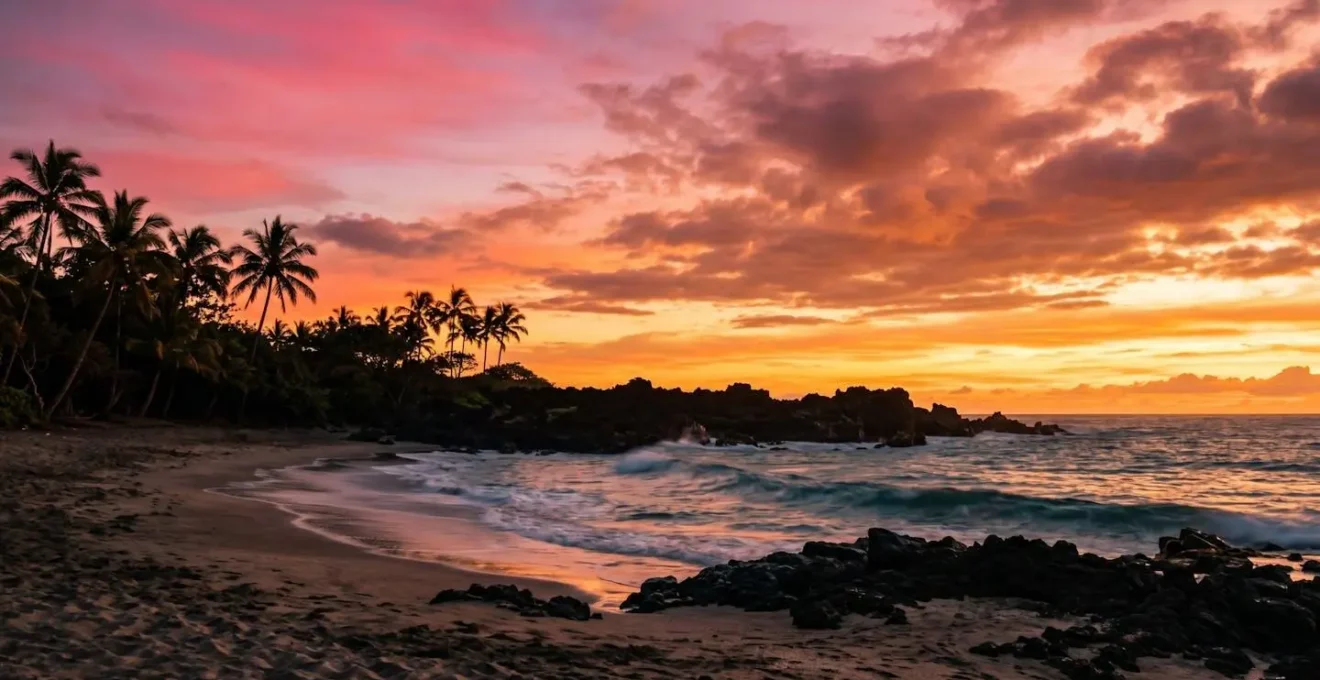
Why Do Western-Facing Island Coasts Produce More Dramatic Sunsets Than Eastern Shores?
The superiority of a western-facing island coast for sunset viewing is a matter of atmospheric physics. As the sun sinks toward the horizon, its light travels through a much thicker slice of the Earth’s atmosphere to reach your eyes. This extended journey acts as a natural filter. The atmosphere scatters shorter-wavelength light—the blues and violets—away from our line of sight. This phenomenon, known as Rayleigh scattering, is why the sky is blue during the day. But at sunset, with the blue light filtered out, only the longer wavelengths of light—the yellows, oranges, and reds—make it through.
A western-facing coast with a long, unobstructed view over the ocean maximizes this effect. The light path over a flat ocean surface encounters fewer land-based obstructions and often cleaner, more stratified air. This allows for a more efficient and dramatic scattering process, leading to the fiery, saturated colours that define a spectacular sunset. An eastern shore, by contrast, is ideal for sunrises, where the same principles apply but in reverse. As a research team at the University of Hawaii noted in a lecture on the topic, this filtering is key to the colour palette we see.
At twilight the sunlight on the horizon is missing the scattered blue light wavelengths giving a yellowish to reddish hue to the low Sun.
– Research team at University of Hawaii, MET 200 Lecture on Atmospheric Optics
Therefore, when scouting an island, your first geographical clue for a prime sunset location is a coastline that looks directly west over an open body of water. This simple geographical factor is the foundation upon which all other elements of a great sunset are built, providing the best possible canvas for the daily display of light.
How to Photograph Island Sunsets With Properly Exposed Foregrounds and Vibrant Skies?
One of the biggest frustrations in sunset photography is the « dynamic range » problem: either the sky is perfectly exposed and your foreground is a dark, detail-less silhouette, or the foreground is visible and the sky is a blown-out, white mess. Modern cameras, including many smartphones, struggle to capture both the intense brightness of the sky and the deep shadows of the landscape in a single shot. The professional solution to this is a technique called exposure bracketing, often used to create High Dynamic Range (HDR) images.
Instead of trying to get it all right in one photo, you intentionally take multiple pictures at different exposure levels and then merge them. You capture one shot that is correctly exposed for the bright sky, one for the dark foreground, and a third balanced in between. When combined using software, this method allows you to retain detail across the entire scene, from the most vibrant colours in the clouds to the subtle textures of the rocks or sand at your feet. This technique is the key to producing rich, detailed, and professional-looking sunset landscapes rather than simple silhouettes.
As the image above illustrates, each bracketed shot captures a different part of the scene’s light information. The underexposed image holds the sky’s detail, while the overexposed image reveals the foreground. Merging them creates a final photograph that feels much closer to what the human eye can perceive. For photographers, mastering this technique is a game-changer.
Action Plan: Mastering the Exposure Bracketing Technique
- Set your camera to bracket 3 exposures spaced 2 EV (exposure values) apart using its HDR or Auto Exposure Bracketing (AEB) mode.
- Mount the camera on a tripod to ensure perfect alignment between shots and use a sequential or burst shooting mode to capture all frames with a single shutter release.
- Take one photo exposed for the bright sky, one for the darker foreground, and one balanced in the middle.
- Merge the three bracketed images in software like Lightroom Mobile or Photoshop, using automated HDR functions or manual layer masking for perfect exposure.
- For complex scenes with elements like trees extending into the sky, use manual layer masking instead of graduated filters to avoid unnatural-looking darkening artifacts.
Clifftop Sunset Viewpoint or Beach-Level Watching: Which Creates More Dramatic Photos?
There’s a natural assumption that a higher vantage point, like a clifftop, will always yield a better sunset photo. The panoramic view is certainly impressive, but from a compositional standpoint, it’s not the elevation that makes a photo dramatic. Whether you are on a cliff or at sea level, the secret to a compelling sunset image is a strong foreground anchor. A photo that is 90% colourful sky and 10% distant horizon often feels empty and lacks a sense of scale or place.
The most engaging sunset photographs invite the viewer into the scene by grounding it with an interesting element in the foreground. This could be a dramatic rock formation, a piece of driftwood, the silhouette of a pier, or the reflective patterns in wet sand. These anchors provide a focal point and create depth, transforming a simple snapshot of a pretty sky into a thoughtful landscape composition. The choice between a clifftop and a beach should therefore be based on which location offers the more compelling foreground elements.
Case Study: The Importance of Foreground Anchors in Composition
A professional photographer case study demonstrated a crucial principle: sunset images capturing only the sky consistently lack viewer interest. The study showed that by intentionally placing compelling foreground elements—such as carefully stacked rocks, driftwood, or natural formations—as the main point of interest, photographers could transform ordinary sunset shots into compelling photographs. This technique often forces the composition to limit the sky to one-third of the frame or less, creating more dynamic images dominated by a strong foreground that tells a story and grounds the viewer in the location.
A clifftop might offer a gnarled, wind-swept tree as an anchor, while a beach provides the opportunity for leading lines from receding waves. The question is not « which elevation is better? » but rather, « where can I find the most interesting subject to place *between* me and the setting sun? » This shift in mindset from a sky-watcher to a landscape composer is what separates a good photo from a great one.
The Sunset Timing Mistake That Means Missing Peak Colour by 10 Minutes
For many, the sunset experience is over the second the sun’s disk vanishes below the horizon. They take their final photo, pack their bags, and head off. This is the single most common timing mistake, and it means consistently missing the most spectacular part of the show. The most intense and vibrant colours in the sky often don’t peak until the « afterglow, » or civil twilight, the period that begins right after the sun has set.
During this time, the sun is just below the horizon, and its hidden light illuminates the higher levels of the atmosphere from below. This indirect light, free from the direct glare of the sun, reflects off clouds and atmospheric particles, often producing breathtaking displays of deep reds, purples, and pinks that are far more intense than the colours seen just before sunset. Experienced photographers know that the real magic often happens 15 to 20 minutes after the sun disappears.
Patience is the operative word. Arriving at your chosen location early is important for scouting composition, but staying late is essential for capturing peak colour. The sky can transform from a mild orange to a blazing magenta in a matter of minutes during this post-sunset window. Planning to stay for at least 25-30 minutes after the sun has officially set is a non-negotiable rule for any serious sunset chaser. This simple act of waiting is what separates those who witness a nice sunset from those who experience a truly legendary one.
When Are Island Sunsets Most Vibrant: Seasonal Atmospheric Patterns and Dust Levels?
Not all sunsets are created equal. Some are mild and pastel, while others are fiery and electric. This variance is largely determined by what’s in the atmosphere. The vibrancy of a sunset is directly linked to the amount and type of aerosols—tiny particles suspended in the air—that the sun’s light must pass through. These particles, which include dust, sea salt, smoke, and pollution, act as a screen onto which the sunset colours are projected. More particles generally mean more scattering and more intense colours.
Seasonal patterns play a significant role. Dry seasons often feature more dust and haze in the air, which can lead to more dramatic red and orange sunsets. Conversely, very clean, clear air after a rainstorm might produce a less colourful but incredibly crisp sunset. The most extreme examples of aerosol-enhanced sunsets occur after major volcanic eruptions, which inject millions of tons of fine particles into the stratosphere.
Case Study: The Mount Pinatubo Eruption and Global Sunsets
When Mount Pinatubo erupted on June 15, 1991, it injected a massive cloud of sulfur dioxide into the stratosphere. This created sulfate aerosols that remained aloft for years, spreading across the globe. According to scientific observations, this event increased the aerosol optical depth by 10 to 100 times normal levels. The result was a period of dramatically intensified sunset and twilight colours visible worldwide, with brilliant yellow-red horizons and vivid purple-pink glows. This global phenomenon provided a clear demonstration of how high-altitude volcanic aerosols act as a perfect canvas for scattering red and orange light, creating the most vibrant twilights in recorded history.
As the atmospheric research team at ScienceInsights notes, this is not a new phenomenon. They state, « The most extreme sunset colors in recorded history have followed major volcanic eruptions. When a volcano injects large amounts of fine particles into the stratosphere, those particles can linger for months or even years, circling the globe. » While you can’t plan your trip around an eruption, you can pay attention to atmospheric conditions. Days with a slight, high-altitude haze or distant dust plumes often promise a more spectacular colour display than days with perfectly clear blue skies.
Why Do Corner Hotel Rooms Offer 180-Degree Ocean Views Worth the 30% Upcharge?
For the dedicated sunset photographer, a hotel room is more than just a place to sleep; it’s an operational base. A standard room with a single balcony offers one fixed perspective. A corner room, however, with windows or balconies on two sides, is a strategic asset that can be well worth its premium price. The value lies not just in the panoramic view, but in the flexibility of multiple vantage points.
As the sun begins its descent, the quality and direction of light change by the minute. A corner room allows a photographer to move between two different perspectives, capturing the evolving light on different elements of the landscape. One window might perfectly frame the sun dipping into the ocean, while the other captures the warm, golden light illuminating a stretch of coastline or a nearby architectural feature. This ability to track and react to the changing conditions without having to pack up gear and race to a new location is a significant advantage.
This tactical flexibility is what transforms a passive viewing experience into a dynamic photographic opportunity. As one professional photographer noted, having access to multiple angles during the critical golden hour is paramount.
Professional beach sunset photographers emphasize that timing and positioning are everything when capturing the perfect shot. The golden hour begins roughly 30 minutes before sunset, providing soft warm light. Having multiple vantage points—such as those offered by corner rooms with windows on two sides—allows photographers to track changing light conditions and adjust compositions throughout the golden hour without missing critical moments. This flexibility to capture the sun’s descent from multiple angles transforms a standard sunset viewing into a dynamic photographic opportunity.
– Professional beach sunset photographers, Tamron Americas Blog
Essentially, paying for a corner room is paying for creative options. It provides the ability to tell a more complete story of the sunset, capturing not just the main event but also its beautiful effects on the surrounding environment.
When Does Natural Light Best Showcase Island Architecture: Seasonal and Daily Timing?
The « golden hour »—the period shortly after sunrise and before sunset—is universally celebrated by photographers for its warm, soft, and dimensional light. When photographing island architecture, this magical light is essential for bringing out texture, shape, and character. However, not all golden hours are the same. The time of day and even the time of year can dramatically alter the quality of this light.
As the team at the Phototime app explains, there’s a distinct difference between the two daily golden hours: « Morning golden light tends to be cooler and softer, casting gentle shadows and a sense of tranquility. In contrast, evening golden light is warmer and more dramatic, infusing scenes with a rich, golden glow and casting longer shadows. » For architecture, this means evening light is often better for creating dramatic, high-contrast images, while morning light is ideal for softer, more serene portrayals. The sun’s low angle at these times reveals textures in stone, wood, and plaster that are flattened by the harsh overhead light of midday.
Furthermore, the duration of the golden hour is not constant; it is dictated by latitude and season. Near the poles, it can last for several hours, while closer to the equator, it can be a fleeting event. According to photography planning tools, the golden hour duration varies dramatically, from as short as 20 to 30 minutes near the equator to several hours in polar zones. This means that on a tropical island, the window for perfect architectural light is extremely brief, requiring precise planning and quick execution from the photographer.
Key Takeaways
- Geography is Key: Always prioritize western-facing coasts with an unobstructed ocean horizon for the most intense sunset colours.
- Technique Over Gear: Master exposure bracketing (HDR) to capture detail in both the bright sky and dark foreground, overcoming your camera’s limitations.
- Patience is a Virtue: The most vibrant colours often appear 15-20 minutes *after* the sun sets. Don’t make the mistake of leaving too early.
Which Islands Offer the Most Diverse Coastal Landscapes in a Single Destination?
While any island with a western coast can offer a good sunset, the truly exceptional destinations for a sunset chaser are those that provide a diversity of coastal landscapes in a compact area. An island that offers a high-altitude mountain viewpoint, a classic sandy beach, and dramatic volcanic rock formations all within a short drive is a photographer’s paradise. This variety allows you to capture a completely different style of sunset photo each evening of your trip.
Diversity means having options for your foreground anchor and overall composition. One evening you might shoot from an elevated summit, capturing a sweeping panorama with the clouds below you. The next, you could be at sea level, using the reflective wet sand and wave textures of a golden beach. A third day might involve a boat excursion, allowing for an eye-level horizon perspective with unique reflections on the water that are impossible to get from land. Islands of volcanic origin, such as those in Hawaii, the Canary Islands, or Iceland, are often prime candidates as their geology naturally creates a rugged and varied coastline.
The ultimate goal for a sunset-focused trip is to build a portfolio of images, not just a single shot. A destination’s value should be measured by its ability to provide multiple, distinct photographic opportunities. This means scouting for islands that offer a mix of elevations, textures (sand, rock, vegetation), and orientations, allowing you to tell a rich, multifaceted story of the sun’s daily farewell.
By shifting your focus from chasing famous names to understanding the ingredients of a great sunset, you empower yourself to discover and capture extraordinary moments. Your next step is to apply this framework—scouting for western coasts, varied foregrounds, and planning your timing—to your next island adventure.